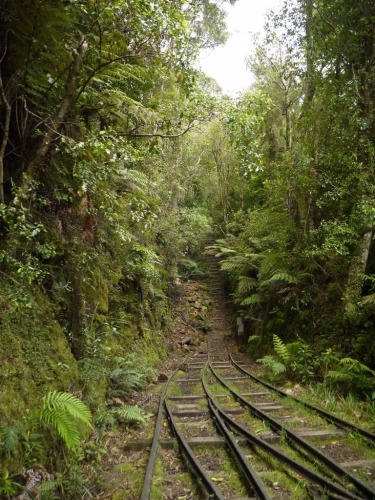
The Kaimai Range is a small mountain range between the Bay of Plenty and Waikato, between the Coromandel and Mamaku ranges. Just a 2 hours drive from Auckland, it offers a lot of great tramping options for weekends and even more. And in contrast with the Coromandel huts, most of the huts in the Kaimais are basic, meaning only $5 and no need to book. This place is often ignored by tourists who just drive from Coromandel to Rotorua, making it a perfect weekend escape, away from the crowds. Plus it has so many things to see, between old tramway tracks, tunnels, mountains, amazing bush and tracks, river crossing, and even glow worms!
This itinerary start in the historic Waiorongomai Valley, where plenty of exploring can be done with lots of old tramway tracks, tunnels and relics from the mining era, before reaching Waiorongomai saddle, just short of Te Aroha, the highest summit of the range (a worthy side trip), then continues along the tough but beautiful Mangakino pack track to Daly’s clearing hut for the night (16 bunks). The next day is more leisurely and mostly downhill on easier tracks to Karangahake Gorge via Dickey Flat campsite.
Note that this itinerary requires a 30 minutes car shuttle and to leave one car at each end, or to leave your car at the end and hitchhike to the start of the walk.
Transport
- Car: 2 hours drive from Auckland to Paeroa, then follow the road down to Te Aroha and 4 km after Te Aroha you will see Waiorongomai Rd on the left. Leaving your car there for the night is usually safe enough. At Karangahake Gorge there is usually a few cars camping there for the night, so it is quite safe as well.
- Public transport: Intercity buses stop at Paeroa and Te Aroha 7 days a week on the Coromandel to Hamilton route. If you don’t want to hitchhike/walk to the start and from the end an alternative route would be to start in the Te Aroha town, skipping Waiorongomai valley, climb to the summit and go down to meet Mangakino pack track. And at Karangahake Gorge you can follow the Hauraki rail trail to Paeroa for 7 km (allow 2 hrs), including 2.5 km of road.
- Bicycle: the best option would be to leave your bicycle with a hostel/campsite in Paeroa and either hitchhike to the start of the hike or take the bus to Te Aroha ($10) and follow the instructions of the public transport option.
Cost
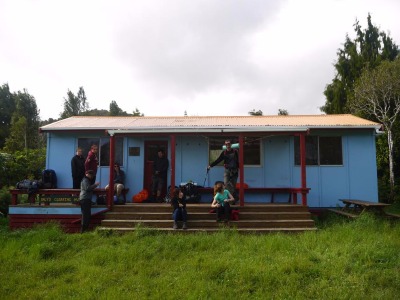
Sleeping in Daly’s clearing hut is one $5 hut ticket per person and must be purchased in a visitor centre or outdoor shop beforehand. Camping beside the hut is free. You should carry a tent if the hut is full, as it can be popular with school groups.
Signage
All intersections on the track are clearly signed. The track itself is marked with orange arrows, like all tracks in New Zealand. It is usually easy to follow and hard to take the wrong track but you should carry a map and compass or a GPS with the topo map on you, just in case.
Day 1: Waiorongomai Valley to Daly’s Clearing Hut — 7-8 hrs
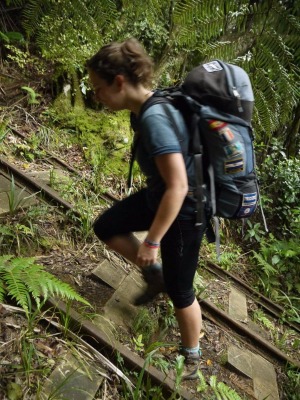
From the carpark at the end of Waiorongomai Rd there’s a few options to reach Waiorongomai saddle. Use the map at the carpark to choose your way. The steepest but the shortest option is probably to walk along the Low Level Pack Track for 45 minutes, take the very steep Butlers Incline (think stairs) for one hour, then continue and take the May Queen Incline. The High Level Pack track is slightly longer and does a bit more of altitude change, but is probably easier than the inclines. Either options should take about 2 hrs to reach the final climb to Waiorongomai Saddle. On the High Pack track you will reach the ruins of Hardys Hut 45 minutes before the saddle, and after joining with the old tramway track a suspension bridge followed by a short tunnel 30 minutes before the saddle. Allow 3 hrs in total between the carpark and the saddle.
At the saddle you reach a junction with the Waipapa track leading to Waitawheta hut, to the right. Take left towards the Mangakino pack track and 2 minutes later you will reach another junction with the track for the summit of Te Aroha. This is a return side trip that would last about 2 hours. A worthy trip but only if the day is long enough and you’re not too tired, as there is still 4 to 5 hours of walking left after that point to reach the hut. And if you are already in thick fog, the trip to the summit would be worthless as you would get no views.
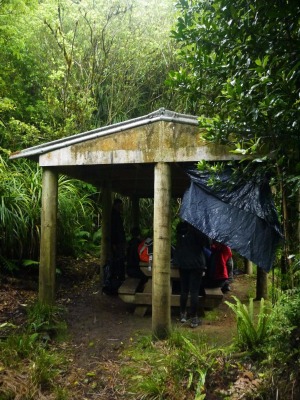
From that second intersection follow the Mangakino Pack Track to the Mangakino Shelter (1 hr 30 minutes) along an easy to medium track. The shelter is a nice place to be in case of bad weather, but calling it a campsite is a bit of a stretch, as there’s not much flat ground around. From the shelter you cross two streams before beginning the hardest part of the walk that will take you about 2 hours and 30 minutes.
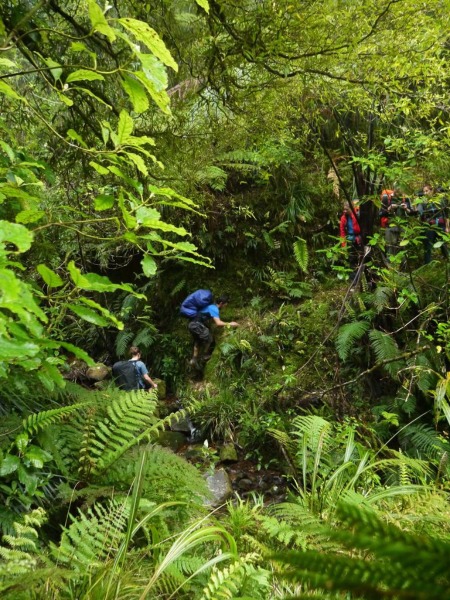
The Mangakino pack track is narrow, often sidling around the side of the hill, crossing gullies, streams and fallen trees. Progress is quite slow, expect less than 2 km per hour. A few times you may have to descend down and climb back up a slippery and muddy gully to avoid fallen trees. Be careful as some parts are slippery after rain. Mud, though, is not too bad or deep usually. This part can also be really dark, even in mid-day looked like it was late evening, making some slippery gullies quite treacherous. After that hard but beautiful part the forest widens and the track becomes more gentle before you reach the intersection with the track for Daly’s clearing hut, only 10 minutes away, but slightly uphill and muddy.
The hut is a bright color with a large clearing in front, toilets, a rainwater tank and plenty of good camping spots hidden in the bush around (the clearing is usually wet and muddy, the bush is a better option). There is no cooking facility at the hut.
Day 2: Daly’s Clearing Hut to Karangahake Gorge — 5-6 hrs
This will be an easier day, at least compared to the adventure that was the Mangakino pack track. Well it is still called the same but the track is much easier today, mostly downhill. From the hut retrace your steps to the intersection and turn right towards Karangahake Walkway. The track is wider and easier, and walking is twice as fast as the previous day precarious and narrow track. After a short climb you begin a long descent that is sometimes very steep and will make your knees cry if you don’t take your time. You finally reach a shallow creek crossing 1 hour 30 minutes after the hut.
Just after the crossing you meet the Mangakino stream track that goes up to Karangahake Mountain summit. This is a nice alternative if you want a more challenging day, as great views are to be had at the summit. It will usually take 3 to 4 hours to reach Karangahake Gorge via the summit, compared to 2.5 to 3.5 hours via the flatter gorge route. While you are here take a look at the Karangahake river (downstream from the creek you just crossed), as you will have to cross that one further on the flat route and if it’s too strong after heavy rain you will have to take the Karangahake summit route instead to avoid a dangerous crossing.
30 to 45 minutes later and a good climb up a ridge you go down again to cross the Karangahake river. If the river is too strong after heavy rain you will have to walk back to take the summit route (doesn’t involve any crossing). Don’t attempt to cross if the flow is too strong, the water color is brown or if you here rocks rolling down.
You then follow a river bend to reach a private campsite. You have to follow the fence on the left and then cross that fence and go right along another fence to reach the Dickey Flat campsite, a good lunch spot with good swimming opportunities.
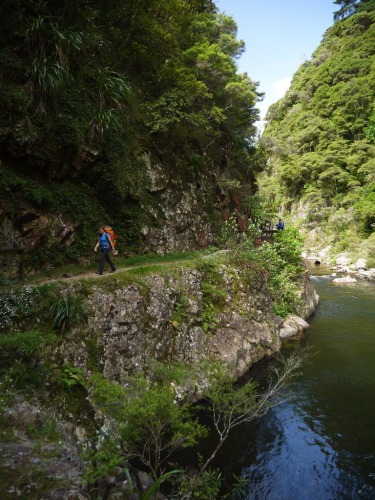
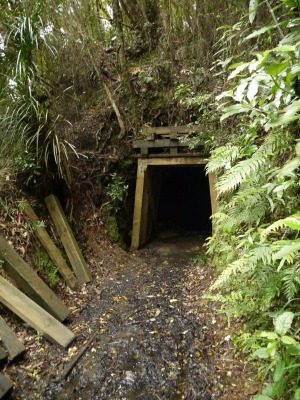
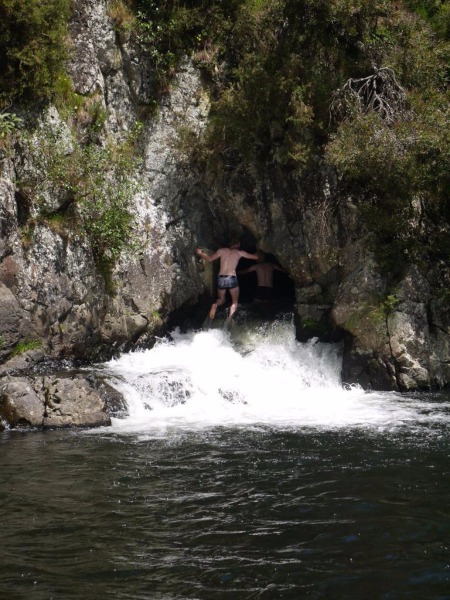
Follow the track along two suspension bridges to reach the Waitawheta Pipeline Track that will take you all the way to Karangahake Gorge. On the way a long tunnel is traversed, where you need to use your headlamp. Watch on the ceiling for glow worms. Just after that tunnel a fine swimming spot can be found for days of fine weather, with an old water tunnel that can be walked (be careful as current is strong) to a “secret” swimming spot.
Not too long after that swimming spot you finally reach the final gorge. The suggested itinerary is to explore the old mining tunnels with your headlamp on the Windows Walk before going back to the carpark. Look up for glow worms, especially in the last tunnel with a wooden ceiling, more glow worms are hidden behind the wood, out of reach and interest of passing tourists.
If you chose the summit option, going back to the Windows Walk is a 10 minutes trip.
To walk back to Paeroa instead of finishing here follow the Hauraki rail trail on the true left of the Karangahake river, allow 2 hours, with the last 2.5 km along a road, take care with cars.